Home | Garden | Orchard | Cooking | Crafts | Lifestyle | Chickens

Thursday, April 30, 2009

Chicken Cilantro Enchilada Casserole

I came across this recipe for enchiladas in the Raley's Something Extra magazine a few years ago. It combines chicken, onions and cilantro for some really tasty enchilada filling. I have never actually made the enchiladas in the recipe because rolling enchiladas takes too much time. I have modified the ingredients and process to make a tasty lasagna-style layered casserole.
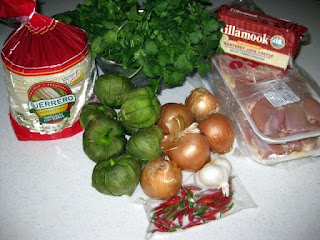
This is the type of dish that works well in quantity. Cooking and assembling a single casserole is almost the same amount of work and making several. With that in mind, I will be making several and freezing some. After gathering my ingredients, I put the chicken in the stockpot to boil.

The tomatillo sauce is next. I put in all 7 tomatillos, 5 cloves of garlic, and some of the little chili peppers. The tomatillos have a great scent. I am looking forward to using more of them this summer since we have 4 tomatillo plants in our garden.

Note: For hot peppers of any kind, be careful when handling. I have experienced a burning sensation in the past on my fingers because I used them the remove the seeds from semi-hot wax peppers. I decided to use a plastic baggie this time since I couldn't remember how hot these peppers were.

While the chicken and tomatillos are cooking, prepare the cilantro and onions. I used my mini chopper for the onions. They were very strong and made me cry more than once. You will likely need two bowls to hold the ingredients. Once the chicken is cooked, drain and chop. Add to the onion and cilantro mixture.

Not forgetting the sauce, drain most of the liquid. I decided to pour the remaining contents into the mini chopper and puree. This worked well. Pour half of the sauce into each bowl and mix.

Next, grate the cheese. I split about 3/4 of the 2lb block between the two bowls. The remaining 1/4 is reserved for sprinkling on the top of the finished casseroles.

The final step is to assemble the casseroles. I use a non-stick spray to coat the pans. Using 9x13 casserole dishes, the first layer consists of 6 tortillas. Spoon out the filling to cover the tortillas.

Repeat the layering until the casserole is full. This time I made 3 layers of filling. Add one last layer of tortillas to the top and sprinkle with cheese. I was able to make three 9x13 casseroles with this quantity of ingredients.

Bake at 350 degrees for 15-20 minutes. Serve in squares as you would lasagna.
Note for frozen casseroles: Defrost before cooking and cook until brown on top (may be longer than indicated above)

My Chicken Cilantro Enchilada Casserole:
~6 lbs boneless chicken thighs
3 bunches cilantro
corn tortillas (the big pack, 84 I think)
4 small onions
2 lb block Monterrey Jack cheese
7 tomatillos
5 cloves garlic
chili peppers

1. Boil the chicken until cooked through. Drain the liquid and chop the meat.
2. In a separate saucepan, cook the tomatillos, garlic, and peppers until the tomatillos are soft
3. Clean and chop the cilantro and onions
4. Grate the cheese
5. Puree the drained tomatillo mixture to make a sauce.
6. Mix the chicken, cilantro, onions, cheese, and sauce in a large mixing bowl (or 2 if necessary)
7. Prepare the casserole dishes by spraying them with non-stick oil
8. Begin layering with the tortillas. It is okay to overlap.
9. Add a layer of filling. Repeat until the layers have reached the top of the dish.
10. Put a final layer of tortillas on top and sprinkle with cheese.
Bake in a 350 degree oven for 15-20 minutes.
Makes three 9x13 casseroles.

Wednesday, April 29, 2009

Checking me out


Snapping a few shots of the chickens this morning allowed me to witness a new behavior. I had my camera down low next to the corner of the run. I was talking, trying to get the attention of the chickens for a photo, and they all came over and crowded in the corner. I am not sure if they were interested in the camera or me. Either way it was fun having them all come over. I even stuck my fingers through the fence and they pecked at them curiously.

Friday Night Clouds


This is what the sky looked like just as we finished the final preparations for the garden. After work, I headed out and cut the fencing to lengths for the tomato trellis' and the holes in the existing perimeter fence. The sky looked ominous the whole time and I even felt a few sprinkles. Fortunately, I did not get drenched. When my husband got home, he pounded the t-posts into the ground and we attached the fencing. The structure of the garden was now complete, but darkness arrived before we could plant. It was also pretty chilly. Planting would have to wait until morning.

Friday, April 24, 2009

Ready to Plant

Planting season has finally arrived. The probability of a frost is now less than 10% in this area (between Auburn and Sacramento), so we now have the green light to plant outdoors. I suppose we could have planted sooner except for the fact that the garden wasn't ready. The plot of land was selected, but covered with weeds. That all changed over the last week.

After attending a vegetable garden growing class at Eisley's Nursery in March, we were armed with information. Mr. Eisley provided recommendations on soil amendments and how to identify pests. Using his recommendations, we visited the nursury last Friday to purchase our supplies. Later that night we borrowed a rototiller and my husband tilled the plot until it was dark.

Saturday morning greeted me with many hours of raking and shoveling. I spent most of the day shaping the beds and walkways in preparation for amending the soil. Once the rows were complete, I spread out the amendments in these quantities:

25 lbs Dolomite Lime
15 lbs Gypsum
5 lbs Superphosphate

This amount covered 500 square feet of beds.

On Sunday, my husband made another pass with the rototiller to mix in the amendments. I then had to re-shape the beds and walkways, cleaning up the excess dirt and weeds. Over the past few nights I continued with the shaping while my husband started installing the irrigation. I think today may be the actual day of planting. The seedlings have been hardening off for the last couple of weeks. They suffered a little through the 90+ degree weather we had earlier in the week, but there was some rain last night and they look refreshed this morning.

I am so excited!!!!

Thursday, April 23, 2009

Citrus Blossoms


When I think of Spring blossoms, I often picture the white and pink blossoms that adorn the orchard trees. By now they are long gone. But to my surprise, there is a second round of blossoms that I forgot about, the citrus. This is one of many blossoms on our mature lemon tree. They are very fragrant and have a nice pink tint on the outside of the white bloom.
In contrast, the mandarin blossoms are solid white and not as fragrant. They are also smaller than the lemon blossoms. I suspect it is related to the size of the fruit that is produced. I can't wait until all the trees start blooming, it is the first sign of fruit to come in the fall.

Tuesday, April 21, 2009

Building the Chicken Coop


The chicks have been growing in leaps and bounds. This recently occurred and the chicks were clearly getting too big for their box. I had been researching different types of coops, trying to figure out which kind to build for our chicks. In the end, we sketched some ideas and put together our plans.

The first part we built was the actual coop portion of the structure. It is a 4x4 foot square, elevated 18 inches off the ground. It is 4 feet tall at the highest point and the roof slopes down to 40 inches at the lower side. Trying to save some money, we were determined to find a much free wood as possible. After scrounging around, we came up with some lumber for the frame and plywood for the walls. Starting with 4x4 inch posts as the corners, my husband cut cleats out of 2x4s as the mounting method for the frame. Once the cleats were nailed in, we attached 2x4 boards in between each post. The result was a suspended box.


On this box we attached plywood walls and some chicken wire at the top for ventilation. Two of the walls are hinged so we can access the coop for feeding, cleaning and hopefully eggs. A third wall has the chicken pop door with a hinge and a very high tech string to pull it open. In our scrounging we also came across some roofing shingles. We attached them to a piece of plywood for the roof. The last step for this part was to attach chicken wire around the bottom three sides of the coop so it is enclosed to the ground. We left the side with the pop door open because it will match up with the run.

Building the run was fairly straightforward. We basically made another box using 2x4s and chicken wire. It is enclosed on three sides and the roof. The only thing we forgot to install on the run was a gate. This would make accessing the chickens a little easier, but we have been able to move the run away from the coop on one side to reach in when necessary. I bought hardware to attach the coop to the run, but after building both of them it was no longer needed. The coop turned out much heavier than planned and the run has enough weight not to move. Adding a ramp was the last step. I made it out of a 1x6 and some stakes.

The chickens have been enjoying life in their new home for over 2 weeks now. The next step is to add wheels to the coop so it is easier to move around.

Friday, April 10, 2009

Seasoned Fish Tacos

We really like tacos. We have been eating them for dinner at least 3 times a week for a while now (5/6 nights this week so far). Ground turkey is one of our standard options for meat, but lately fish has been taking center stage. After reading the nutrition information of the prepared taco seasoning, we noticed that it is very high in sodium. Not wanting to consume that extra amount, we tried making our own. The combination has become our favorite to put on fish, but I suppose it could be used on other meats as well.

Seasoned Fish:
Fish of your choice (we usually stick to white fish like catfish or sole)
Paprika
Ground Cumin
Garlic Powder
Chili Powder
Olive Oil


1. On a piece of foil large enough to hold your fish, drizzle olive oil in the center area. This is to prevent the fish from sticking to the foil when cooking. Place your fish in the oil.


2. Sprinkle each of the 4 spices over the fish coating well. I usually rub them in so they stick to the fish. Flip over the fish and repeat.


3. Once both sides are fully seasoned, drizzle a little more olive oil on top of the fish (again to prevent sticking).


4. Fold the foil so to make a packet of sorts with the fish sealed inside. If your foil is not big enough to wrap around the fish, add a small piece to cover the center of the fish will dry out (trust me on this one).


5. Crank up the BBQ so it is nice and hot (maybe 350-400 degrees) and put the fish packet inside.


6. Cook for ~20 minutes or until the fish is done. No need to flip or rotate the fish. It will cook all the way through in the foil.

After removing the fish from the foil it can be served. Depending on the spine content of the fish, we will sometimes take some forks and shred the meat. This is good for filling taco shells. Another option is to assemble a taco salad where the toppings are layered in a bowl and a serving of fish is placed on top. This makes for a nice presentation (sorry no picture - we were hungry)

Monday, April 6, 2009

Time to move?

5 ways to know that it is time for the chicks to leave the nest (at least the cardboard one):

1. They have more feathers than fuzz


2. The food and water dishes are constantly being knocked over as the chicks try to fly

3. Keeping up with the chicken poop is becoming an all day job


4. Bringing them in for the night requires two people to make sure they don't fly out of the box in transit

5. They clearly enjoy the extra room to stretch

Friday, April 3, 2009

Seedlings in despair

I think I may have killed some...


Spring officially started about 2 weeks ago. The weather was warm. I was dreaming about the garden and the promise of summer vegetables. Thinking that there may be a chance to plant the garden early, I moved the seedlings. They had been living under non-threatening fluorescent light since they were planted. I moved them near a south facing window and exposed them to sunlight. After leaving them there for a day, I put them outside, completely forgetting the gradual process of hardening off.

The parsley suffered the worst, but the cucumbers aren't very far behind. It took me a couple of days before I realized that I was the cause of the suffering. Since that realization, I have been a little more judicious about taking them outside. I have to remind myself to be patient with the plants (and not to kill anymore).

On the other hand, the tomatoes look great.
Related Posts with Thumbnails
 

_ | _