Home | Garden | Orchard | Cooking | Crafts | Lifestyle | Chickens

Wednesday, March 31, 2010

California White at 5 weeks

The chicks are now 5 weeks old. This week, I am profiling one of our breeds, the California White. Of course, this choice was based purely on which chick took the best picture today.

I picked up two of these chicks on a whim at the feed store because I thought they would look neat with the mix of black and white feathers. The breed is a hybrid cross between a California Grey rooster and a White Leghorn hen. Online, I have found mixed reviews for the California White breed. From the Leghorn heritage, they could have a tendency to be nervous and flighty. But, I have also seen them described as friendly. They lay a lot of white eggs and weigh around 4.5 pounds when mature.

Even though the chicks are growing rapidly, they are still dwarfed by the other "White Chicken" that lives here. In their defense, White Chicken is a Light Brahma which is a notoriously heavy breed weighing in at nearly 8 pounds.

Sunday, March 28, 2010

Can you smell the daffodils?

I was away for a couple of days this weekend. Before I left, there were a few daffodils blooming. Today, it looks like all the bulbs I planted are up and open. I purchased a fragrant mix and I thought I had been mislead because the scent has been slim to none. However, the fragrance coming out of the flower bed confirms that yes, I did receive the fragrant mix.

Wednesday, March 24, 2010

4 Weeks and Growing

The chicks are getting bigger everyday. Here is one of the Buff Orpington chicks. Feathers are coming in on their tails and heads. They look pretty funny with a mixture of smooth feathers and fuzzy down sticking out.
This past weekend, we moved the PVC run from Brown and White Chicken's coop to the new Chick Condo. The chicks seem to enjoy scurrying through the grass and trying out their wings. My husband affectionately called them "lawn rats."
They have even tried roosting on the door. Although that doesn't last too long (especially when a second chick tries to join in).

Monday, March 22, 2010

Kitchen Garden

Since moving here, I always thought it would be nice to have a kitchen garden of herbs just outside the door. Unfortunately, we didn't have a fence so any efforts to grow herbs would likely have been foiled by deer. Now that we have a fence, the kitchen garden became a reality. On Friday night, I didn't start out clearing the beds to start this garden. I was trying to prevent the spread of a horrible weed that has little spiky spirals. They are green now but dry out in the summer and stick to your socks. I cleared this area because this weed was starting to spread.

Once I started, I continued all around the patio. It was my hubby's idea to plant herbs and I thought it was a great idea. Luckily, I grew several perennial herbs last summer and they overwintered well in the garden. We had enough plants to fill the bed without having to buy anything. Before transplanting, I had to address the soil issue. And by issue, I mean clay. I loosened the soil and amended it with some rich black dirt from the vegetable garden. Once the soil was ready, I planted the following:

Already in the bed
Dwarf Pomegranates

Grown from seed last year
Lavender
Oregano
Thyme
Sage
Parsley

Transplanted from our yard
Lavender

To be added
Basil
Onions
Flowers from Winter Sowing

Wednesday, March 17, 2010

Moving Day...and the Chick Condo

On Sunday, the chicks woke up and it was business as usual. They had been living in a 50 gallon container for the past 2 weeks in our laundry room. If you have ever raised chicks, you know that this was pretty much as long as you want them inside. They were making tons of chick dust and didn't smell too great. I decided to move them outdoors sooner than last year's chicks (which were brooded in a bathroom destined for demolition - so the chick dust wasn't a big deal).

We have plans to build a permanent chicken coop so all the chickens can live together (currently White Chicken and Brown Chicken have their own place). But that is a few months out. In the meantime, I wanted a semi-permanent shelter that was similar to a chicken tractor and allowed the chicks to be on grass. Thus, the Chick Condo was built.

The Chick Condo was built using 2x4 pieces leftover from gates we constructed for our new fence. There were just enough to make a 3' x 3' square, that is 18" high. The roof is some plastic from an old greenhouse. A few other scrap pieces of wood and old baseboards completed the structure. I wrapped chicken wire around the walls and added 2 pieces of culled lumber ($.50 a piece) as walls until the weather warms. A leftover hinge and latch allowed me to hang the door without a trip to the hardware store. The condo has two access points, the door and through the roof. I built it so the roof can lift off in case we need to access the chicks and they run into the corner like this:

I also put in a roost. On Sunday the chicks didn't attempt to get on it, but now many of them have been able to fly/jump up. They are still sleeping on the ground (next to the heat lamp), but I expect they will be roosting soon.

The last thing I did was to let out Brown Chicken and White Chicken so they could free range and "meet" the chicks. The ironic thing about the meeting was that White Chicken seemed to be afraid of the chicks and ran across the yard and hid under the patio table. Brown Chicken quickly followed suit. I called them out and they returned to their foraging. They have been okay since.

Tuesday, March 16, 2010

What's Different?

Today, the chicks are 3 weeks old. They are getting more feathers and are almost twice the size from when we brought them home. The chicks love to scratch grass and dirt. They are getting more outgoing and will come to inspect my fingers when I wiggle them. They have also moved - notice they are standing in grass not shavings. They are also learning to roost in their new home. Tomorrow, I will post about the big move and their new "Chick Condo."

Lentil, Rice, and Onion Pilaf

Over at Tasty Kitchen, I came across this recipe for Mujadara: Rice, Lentils, and Caramelized Onions. I hadn't ever heard of Mujadara, but I had all the necessary ingredients on hand and the dish sounded good. In case you were also wondering, Mujadara is just what the title indicates: cooked lentils, onions, and either rice, wheat, or groats. I have also been craving some beans lately (it's been over a month since our January soup marathon). Of course, I couldn't just follow the recipe exactly, so here is my take:

6 medium yellow onions
2 cups lentils
1 teaspoon freshly ground pepper
7 cups water
2 cups brown rice
2 teaspoons ground cumin
Olive oil

1. Cut one onion in half, then slice into half-moon shapes.
2. Sauté the onion in some olive oil until it caramelizes (softens and turns brown).
3. Add the lentils, pepper, and water to the pot and bring it to a boil.
4. Once it reaches a boil, reduce heat and simmer for 20 minutes.
5. Add the rice and cumin. Simmer for an additional 45 minutes (brown rice takes longer to cook. White rice would be done in 20 minutes).
6. While waiting for the pot to boil, slice the remaining onions into half-moon shapes. Place them in a separate sauté pan and caramelize until they are golden brown.

If you can stand cutting all the onions, the smell of them cooking is wonderful. Not to mention the aroma when the cumin was added to the pilaf. The end result was delicious, economical, and vegetarian. We ate it with a dollop of Mediterranean Labne Kefir cheese, which was a nice contrast to the cumin.

I doubled the amount of lentils/peas and rice from the original recipe and we finished it within a day. It may have been even better the 2nd day - my husband even ate it cold.

Monday, March 15, 2010

Garden Bloggers' Bloom Day March 2010

It has been quite some time since I posted on a bloom day. There are a few things blooming this month here at Loomis Living.

This beauty was one of the few established plants here when we moved in. It is a 6+ foot Camellia plant that is on the east side of the house. For some reason, the deer haven't felt the need to snack on it.
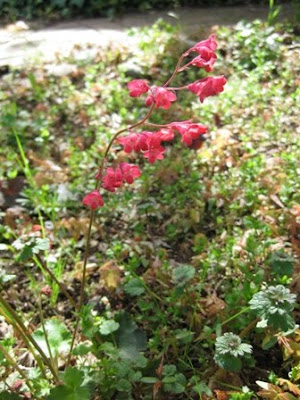
Last fall, I planted a Heuchera garden and this is my first experience with their flowers. Commonly known as Coral Bells, these cute little flowers look like dainty hot pink bells hanging off a slender stem. We have 2 of these blooming right now. Unfortunately, they didn't have name tags so I don't know the variety. Any help identifying them would be greatly appreciated.

This one is isn't blooming yet, but the leaves are as pretty as a flower. It is called Pinot Gris.

Last, is the newest addition to our garden. I purchased an aromatic daffodil mixture and this is the first bloom. Since it was an assortment, I don't have the name. After some research, I think it may be a Birma.

More Seeds

It has been one week since the peppers and herbs were started. The sweet basil is doing well (you can see it on the right side of the closer flat). There are only 2 visible pepper seedlings, but I anticipate that more will soon follow.

Once the basil sprouted, I removed the plastic "greenhouse" to ensure that there is enough airflow around the seedlings. I learned this lesson the hard way last year.

This morning, I planted the tomato seeds (in the rear flat). It is mostly a repeat of last summer's crop, with the addition of Roma. To be complete, here is the list:
Roma VF
Red Oxheart
Tigerella
Rutgers-Select
Red Cherry Large
Tomatillo

Monday, March 8, 2010

Seed Starting (Finally)

Today, I started the seeds for our vegetable garden. My approach this time around is quite different from last year. First off, I am starting the seeds over a month later. Secondly, I am greatly limiting the types of seeds I am starting and growing.

2010 will be the "Year of the Pepper" because I plan to grow 3 additional varieties of peppers over last season's crop. I started all 6 today:
Cayenne
Jalapeno
Hungarian Hot Wax (from the seeds I saved last year after making this mustard)
Pepperocini
California Wonder
Mixed Bells

I also started sweet basil, lemon basil, and parsley. Once this flat (48 cells) germinates, I will move the heating mat to the next flat and start the tomatoes.

Garden Journal - Pruning


Pruning has been on my list of to-do's for a while now. We attending a tree pruning class at Eisley's Nursery at the beginning of February. From that class, the first priority was to spray the trees with a fungicide (we were long overdue!) Once the Copper spray had been applied, the next step was to prune. I finally got around to it yesterday.
Above is the Giant Babcock Peach. It has already started blossoming. So has the Fantasia Nectarine. I am concerned that some of the other trees didn't make it through the Winter storms we experienced this year. I will give it another week or two for the blossoms to come out before looking for replacements.

Friday, March 5, 2010

Grass Lovers

It was just last Friday that we brought the new chicks home. They have grown wing feathers and are starting to make more noise. I can't remember whether the chicks from last year were as easily frightened. These guys will freak out and run away at most sounds. Not to mention when I stick my hand into the tub to refill their food and water.

There is one thing that I have found that will hold their attention - grass and dirt. They were really excited when I put it down and forgot all about being scared. I am considering this early training since they will eventually become grass-fed hens.

Healthy Cranberry Muffins

Candace the neighbor left a comment requesting a healthy cranberry muffin, with fresh cranberries. I made two different versions that both have fresh cranberries, whole wheat flour, and are low sodium.

For both versions, I started out by mixing a batch of my low sodium baking mix. It makes it really easy to put the recipes together.

Cranberry Orange Muffins
1 cup baking mix
1 egg
1/3 cup milk
1/3 cup orange juice
2 tablespoons oil
3/4 cup chopped fresh cranberries

Cranberry Honey Muffins
1 cup baking Mix
3 tablespoons honey
1 egg
1/2 cup milk
2 tablespoons oil
3/4 cup chopped fresh cranberries

Directions
1. Mix everything but the baking mix and cranberries in a bowl.
2. Add the baking mix and stir. It will be lumpy.
3. Mix in the cranberries.
4. Spray Baker's Joy into the muffin tin and fill. Or you could use papers, or just grease the pan.
5. Each recipe made 6 large muffins. It could be stretched to 8 or 10 with smaller ones.
6. Bake at 400 degrees F for 15 minutes.
7. Remove from oven and place on a rack to cool.

The 6 muffins on the left are the ones with orange juice. They were a little more moist due to the extra liquid. The 6 on the right have the honey. I personally liked the orange version more, but both were tasty.

Thursday, March 4, 2010

Winter Sowing Update


Last week, I tried my hand at winter sowing. I peeked into the containers today, and to my surprise there were tiny seedlings looking back at me. A quick check confirmed all but 2 of the containers were sprouting (come on Columbine and Coneflower - don't disappoint me). Since this is the first time I have tried this method, I wasn't sure what to expect. So far, I am liking the process.

Wednesday, March 3, 2010

Whole Wheat Low Sodium Baking Mix

Over at Chickens in the Road, there is a quick mix that is used as a base for biscuits, muffins, and pancakes. I have modified it to fit our low sodium diet and used whole wheat flour.

Ingredients
5 cups whole wheat flour
1/4 cup Demerara Cane sugar
1/4 cup Hain Featherweight baking powder*
1 1/4 teaspoons Fruit Fresh citric Acid crystals **

Combine all ingredients in a large bowl and store like flour. I used a large container with a lid. The baking mix has 0 mg sodium.

* This baking powder is the key to the low sodium baking mix. It is made with potassium instead of sodium.

** The original baking mix calls for cream of tartar (tartaric acid), which contains a lot of sodium. I substituted citric acid crystals to help as a preservative (not that the baked goods last that long).

Monday, March 1, 2010

Chicks!


We decided to raise baby chicks again this year. Even after some unfortunate events with our chickens last year, we still enjoyed them a lot and wanted more. We have added 9 pullets (we hope!) to our flock. Technically, they are still in a separate brooder in until they get old enough to join the adults.

For our brooder, we are using a 50 gallon Rubbermaid plastic container. This will be their home for the next 3-4 weeks, until we move them into a small chicken tractor outside. They will still be separated from the adults, but will have more room and be on grass (starting their grass ranging early).

Here is our current chicken lineup:

1 Light Brahma aka "White Chicken"
1 Americauna aka "Brown Chicken"
4 Golden Laced Wyandottes
3 Buff Orpingtons
2 California Whites

It has only been 3 days since we brought them home and already they are sprouting feathers.
Related Posts with Thumbnails
 

_ | _